One can name various components inside an Excel spreadsheet. These include a single cell, or a range of cells, or an embedded object such as a chart. While all such names are useful, it is also possible to name formulas. Named formulas have many uses both in the construction of array formulas for use in a worksheet as well as in simplifying the creation and maintenance of charts.
|
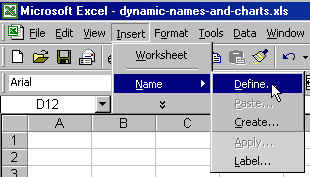
To create or modify a name, the Define Name
dialog box is accessible from
|
|
|
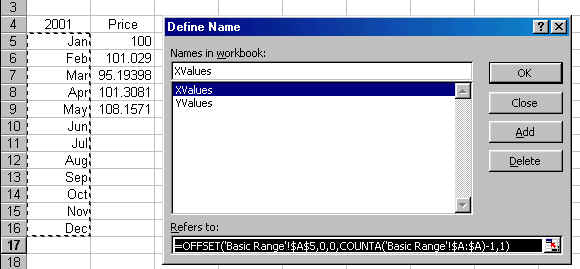
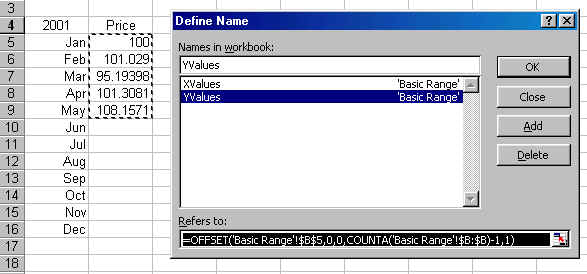
The easiest way to create a name is to type in a name in the first field, tab over to the 2nd field (or click the 2nd field with the mouse) and enter a formula. Note that one does not have to type in cell references. It is a lot easier and a lot less error-prone to use the mouse to select a cell, a cell range, or an entire row or column. Names entered in this manner are 'workbook level' names. They can be used in any worksheet in the workbook. |
|
|
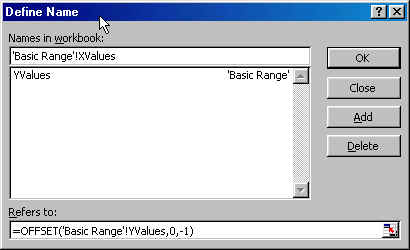
Of course, there are many instances when one wants to create a name that is specific (local) to a worksheet. One reason for doing so might be to use the same name on different worksheets to refer to something specific to each sheet. To create such a name, precede the name with the name of the worksheet. Note the use of single quotes around the worksheet name and the exclamation mark between the worksheet name and the name being created. If done correctly, Excel will display the sheet name on the right of the newly created name (see the middle pane of the lower dialog box on the right). |
|
|
There is a third way of creating named formulas. In this, the cell references are preceded by just the exclamation mark (i.e., !) without the sheet name. Now, Excel creates a global name that refers to cells on the active sheet! While this is a very useful technique, such a name cannot be used in a chart. |
 |