I first saw this tip in a newsgroup post by Tom Ogilvy, a fellow Microsoft MVP for Excel. He showed how to associate with a menu item’s ‘OnAction’ property a macro declared with arguments. Further experimenting with the idea extended the applicability of this technique to other Excel elements.
There are many instances that one wants to associate with different Excel entities code that is similar but not identical. One example would be menu items that perform similar but not identical functions. Another example would be shapes or controls in a worksheet wherein the associated macros perform almost identical functions. Or, one might have controls on a userform that carry out very similar processing. In one instance, someone wanted to enter data that would consist of a single character. Rather than type {character}ENTER{character}ENTER, this person wanted to just enter {character}{character} and have Excel automatically move to the next cell. Combining the technique documented in this tip with an infrequently used capability, the OnKey method made this relatively easy to implement. The reasons for associating with an Excel object a procedure declared with arguments are probably as diverse as the people who use the program.
This tip applies to the following objects and methods:
· Shapes inserted into the worksheet layer through the Drawing toolbar
· The OnAction property of a command bar button (menu item).
· Excel’s OnTime and OnKey methods
· The macro assigned to an Excel Forms button (one added using the Forms toolbar – distinctly different from the Control Toolbox toolbar)
The reader may have noticed one important exception from the list above, that being the objects available from the toolbar named Control Toolbox. These are the same ActiveX controls that are used in Excel and other Office userforms. It is possible to write a single procedure that deals with multiple controls but it requires a different technique based on creating a class that contains a ‘WithEvent’ object. See xxx for more.
One important caveat. The capability used in this tip not documented. While it has been consistently supported by Microsoft since at least Excel 97, the very fact that it remains undocumented means one will have very little recourse if Microsoft stops supporting it.
Bruce M on Nov 7, 2011:
This article gave me the idea to embed json encoded data in the alternate text property of a shape that could later be retrieved via the onaction event of that shape. Thank you. See http://ramblings.mcpher.com/Home/excelquirks/jsondynamic
The usual way one declares and uses a procedure with an argument is
Sub SubWithParam(ByVal X As Integer, ByVal Y As String)
'...
End Sub
Sub CallSubWithParam()
'...
SubWithParam 1, "This string"
'...
End Sub
At the same time in all of the available documentation on how to associate a procedure with the objects and methods listed in the introduction there is no mention of including an argument when calling the procedure. For example, the documentation for the OnTime method contains:
Procedure Required String. The name of the procedure to be run.
'…
Application.OnTimeNow + TimeValue("00:00:15"), "my_Procedure"
The same applies if one looks up the OnAction property of a Shape object or a commandbar button.
The key to making this happen can be summarized in one sentence. Enclose the macro name and the argument value within single quotes. The rest of this document explains this concept in more detail.
Consider three macros in a standard module as shown in Code Sample 1. The first requires an integer argument, the second a string argument, and the third both an integer and a string argument.
Option Explicit
Sub MacroInteger(I As Integer)
MsgBox "Integer i=" & I
End Sub
Sub MacroString(S As String)
MsgBox "String value=" & S
End Sub
Sub MacroIntegerString(I As Integer, S As String)
MsgBox "I=" & I & ", S=" & S
End SubOption Explicit
To call these from a VBA module, one would use syntax as in Code Sample 2.
Sub callMacros()
MacroInteger 7
MacroString "a String"
MacroIntegerString 4, "some string"
End Sub
Put three shapes such as rectangles in a worksheet as in Figure 1.
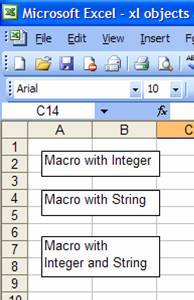
Figure 1
We will assign the subroutine MacroInteger to the shape named ‘Macro with Integer,’ the subroutine MacroString to the shape named ‘Macro with String,’ and the subroutine MacroIntegerString to the shape named ‘Macro with Integer and String.’
Right click the shape captioned ‘Macro with Integer’. Select ‘Assign a macro…’ from the context menu. In the resulting Assign Macro dialog box, in the ‘Macro name’ field enter 'MacroInteger 7' as shown in Figure 2. Note the use of single quotes at the beginning and the end of the name. Also, even though it is called the Macro name field the use of single quotes allows us to provide an integer value for the argument. Close the dialog box with the OK button. Once done, click on the rectangle captioned ‘Macro with Integer’. The macro MacroInteger will run and Excel passed to the argument I, i.e., 7.
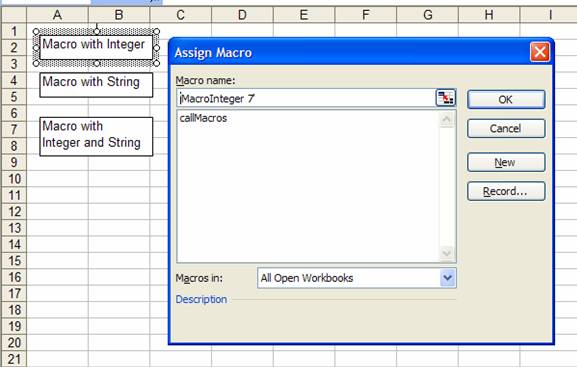
Figure 2
Next, assign the macro MacroString to the rectangle captioned ‘Macro with String.’ This time since the argument is a string it must be enclosed in double quotes as shown in Figure 3. Note the continued use of a single quote at the start and at the end. Once done, click the ‘Macro with String’ rectangle. Excel will run the MacroString subroutine and display the value of the argument S, i.e. “a string.”
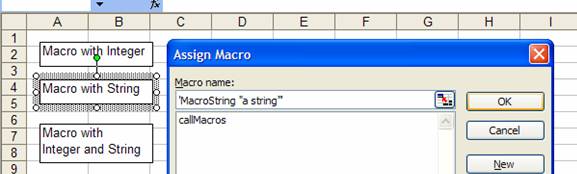
Figure 3
Once the basic concept is understood, it is easy to extend the idea to cover subroutines with multiple arguments. We will look at a subroutine with two arguments, one an integer, the other a string. This time, the macro name looks as in Figure 4 and, once again, has a single quote at the start and the end. Once done, click the rectangle with the caption ‘Macro with Integer and String’ and Excel will display a message box with the values assigned to the two variables, i.e., 8 and “some string.’”

Figure 4
The technique illustrated above also works with the OnAction property of a command bar button. To see this, use Tools | Customize | Toolbar tab to create a new command bar. Name it ‘Menus with arguments.’ From the Commands tab, in the Categories pane select ‘Macros.’ From the Commands pane click and drag the ‘Custom menu item’ to the new command bar. Repeat this two more times to get a new command bar with three items as in Figure 5.
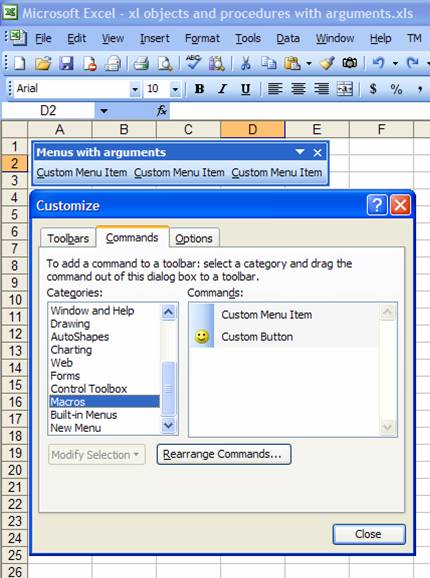
Figure 5
Right click the first ‘Custom menu item’ and from the context menu change the caption to ‘Macro-Integer’.
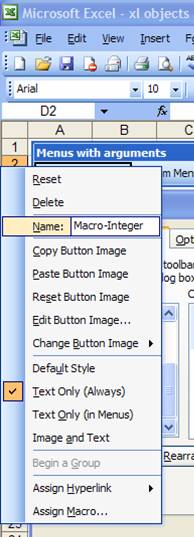
Figure 6
Then, select the ‘Assign Macro…’ item. In the resulting Assign Macro dialog box enter 'MacroInteger 17' – don’t forget the single quotes at the start and the end. Except for the value of the argument this is exactly the same as with the shape ‘Macro with Integer’ above. Close all open dialog boxes. Click the Macro-Integer button. Excel will run the MacroInteger subroutine and display the value passed to the argument, i.e., 17.
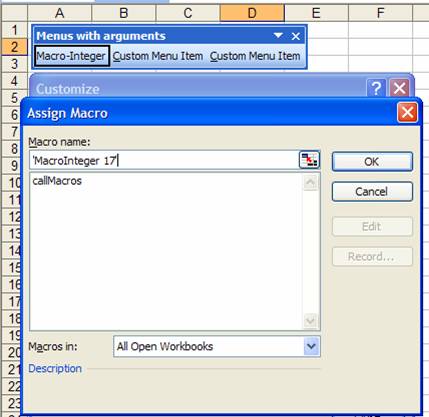
Figure 7
Repeat the exercise for the other two buttons: assign the captions Macro-String and Macro-IntegerString as well as the macros 'MacroString "ButtonString"' and 'MacroIntegerString 27,"String with Integer"' to the two buttons respectively.
While the above technique works well with command bar buttons, the documented, and consequently more mainstream so to say, technique would be to use properties associated with the button object. Two properties that are meant for custom use are the Tag and the Parameter properties. Effectively, as long as one wanted to pass just one piece of information – or at the most two – one could use these properties. The other issue, of course, is that these cannot be specified through the UI. They must be set through code but, for most practical purposes, this limitation is not important since most custom command bars are managed programmatically.
The technique illustrated above also works with the OnTime and the OnKey methods. Simply apply the above technique of enclosing the entire string in single quotes to the OnTime argument. Note that when one of the arguments is a string, the corresponding string literal must be enclosed in double-quotes. Code Sample 3 demonstrates establishing a timed call to the MacroIntegerString macro with a literal string.
Sub callOnTime()
Application.OnTime Now + TimeSerial(0, 0, 1), _
"'MacroIntegerString 37, ""OnTime String""'"
End Sub
This is a very powerful capability. The applications are probably limited only by one’s own imagination. Two examples follow.
We can schedule multiple calls to the same routine and include information in the arguments that let the code know how it was called. Code Sample 4 illustrates this.
Sub callOnTimeMultiple()
Application.OnTime Now + TimeSerial(0, 0, 3), _
"'MacroIntegerString 37, ""OnTime String 3 secs.""'"
Application.OnTime Now + TimeSerial(0, 0, 5), _
"'MacroIntegerString 57, ""OnTime String 5 secs.""'"
End Sub
Another example would be the following: imagine running some code every 15 minutes. However, every hour the processing involves some additional work. By passing a flag as an argument, we could accomplish this quite easily.
The same process applies to assigning a subroutine with arguments to an Excel forms control. Note that this is a control from the Forms toolbar. To access the Forms toolbar, select View | Toolbars > Forms. Insert a Button into the worksheet, right click this inserted button and select Assign Macro… Assign a macro as shown in Figure 8 remembering to enclose the entire string in single quotes. Once done, test the result by clicking on the button. The macro should run and display a message box echoing the values passed to it.
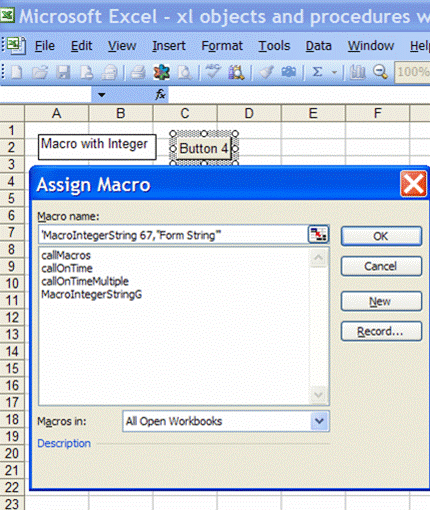
Figure 8
This chapter documents a very powerful technique. While undocumented it has been supported by every version of Excel going back to at least Excel 97. By now how to use the technique should be clear. The entire string representing the subroutine name and the arguments is enclosed in single quotes. Any string value (passed to a corresponding argument declared as ‘As String’) is enclosed in double-quotes.

