Introduction
Excel's Range 'Object'
The unqualified use of the Range (or Cell) property
Example 1: Moving beyond the macro recorder's use of Select and Activate statements
Example 2: Save the current content of cell A1 in the first empty cell starting with AA1
Example 3: Save the content of cell A<current row> in the first empty cell in or to the right of column AA (in the current row)
Example 4: Add a formula to a range of cellsStreamlining the macro recorder code for charts
Excel User on May 25, 2011
Very well written. I especially like how it went step by step changing the code from the macro recorded version to a more concise version. Well done!
Many people who use Excel on a regular basis quickly realize that they perform the same, or similar, task repeatedly. This might be copying the formula in one cell to another, or saving the current value of a cell in some other cell, or adding new data to a set of existing data. It could be applying the same format, or conditional format to multiple cells, or formatting each new chart so that all charts have a similar look such as an organizational template. In each instance, the solution is to use some type of program, often called a macro, written in the Visual Basic for Applications (VBA) programming language.
To help get started, or to get the correct code and syntax for most tasks, Excel has an excellent 'macro recorder' facility that converts user actions into VBA code. This facility can help someone new to programming quickly develop easy macros. Its use is not restricted to the new programmer. It is often used by experienced developers to get 'starter' code for a particular task. That way, the developer doesn't have to memorize the nitty-gritty syntactical details.
This tutorial is not meant to be an introduction to macro programming in Excel. If you haven't used the macro recorder, try it now. Activate it with Tools | Macro > Record new macro... Then, carry out some actions such as copying the contents of one cell and pasting them into some other cell. Turn off the recorder, and switch to the Visual Basic Editor (VBE). There, you will find the Excel generated code corresponding to your actions.
The intent behind this tutorial is to demonstrate a few simple techniques to marry the macro recorder code with the power of Excel's Object Model (EOM). We will do so with a few examples. The first (see Macro3 below) reflects the following user actions: select cell A1, copy its contents, move to cell AA1, and paste the copied contents there. The macro was recorded by Excel's macro recorder facility.
Sub Macro3()
    '
    ' Macro3 Macro
    ' Macro recorded 4/2/2003 by Tushar Mehta
    '

    '
    Range("A1").Select
    Selection.Copy
    ActiveWindow.LargeScroll ToRight:=1
    ActiveWindow.SmallScroll ToRight:=4
    Range("AA1").Select
    ActiveSheet.Paste
    End Sub
Effectively, the code above duplicated the user's actions including the selection of each of the cells, A1 and AA1 and the scrolling to the right. While this accomplishes the task of copying the contents of cell A1 into cell AA1 and is an excellent way to get started, there are two problems with it. First, the macro is specific to cells A1 and AA1. Suppose the idea is to copy the contents of some cell in column A into the corresponding cell in column AA. How, then, would one modify the above macro to allow such flexibility? The second problem lies in the various select and scroll operations. With them, Excel correctly duplicates the user's actions. However, when the macro is run, Excel must update the visual display on the screen. Refreshing the screen is both unnecessary and wasteful. It also slows down the execution of the macro..
In example 1, we will see how to simplify the above code to the one-liner.
Sub Macro4()
    Range("A1").Copy Destination:=Range("AA1")
    End Sub
Once the transformation from Macro3 to Macro4 is understood, in example 2, we will address the more advanced task of saving the current content of cell A1 in the first empty cell starting with AA1. Next, in example 3 we will look at how to do the same for the row currently selected by the user. Finally, example 4 introduces some more advanced concepts.
Before getting down to the tasks at hand, a short detour is in order. In the Excel Object Model, the Range collection is one of the most confusing and difficult entities to understand. As a result, most programmers fail to fully exploit its capabilities. Why is it not understood well? First of all, to even find it in the help documentation, one has to search for 'range collection,' not 'range object.' Once the correct documentation is located, the next question becomes what is this range object and what properties and methods does it support? Well, the range collection -- to use its correct designation -- is a collection of one or more cells. For example, cell A1 is a range, as is the collection of 16 cells from A1 to D4. A range collection doesn't even have to be contiguous. It could be the three cells A1, B2, and D4.
Understanding the range collection is important because of the properties and methods it supports. These let us check the contents or format of the specified calls, modify the contents (be it a constant value or the formula), as well as change the format of the cells represented by the range collection. For example, the code to add one to the current value in cell A1 would be
Range("A1").Value= Range("A1").Value+1.
How does one get a range object (or collection)? One way is the direct way as in the code fragment above. Range("A1") creates a range collection. The other is to set a VBA variable to a range. This second method has the advantages that subsequent references to the range are much simpler. In addition, it provides greater flexibility. The code to add 1 to the value of cell A1 would now look like:
Dim aRng as Range
Set aRng=Range("A1")
aRng.Value= aRng.Value+1
Note that the Range("A1") now appears only once. Subsequent references to the cell are through the VBA variable aRng. If, for some reason, we now wanted to change the value in cell B1, there is only one reference to cell address A1. In comparison, the previous example had two references to the cell address.
There are still more ways to create a range collection. Some of these are the result of using an appropriate property of a worksheet object while others are the result of a property of an existing range collection itself. For example, the Range property of the worksheet object results in a range collection object as in
Sub Macro6()
    Dim aRng As Range
    Set aRng = ActiveWorkbook.Worksheets("Sheet1").Range("A2")
    End Sub
What if one desired the flexibility of specifying the cell using the row and column numbers? In that case, one could use the Cells property of the worksheet object. Just as the Range property returns a range collection, so does the Cells property. Cells(<row>,<column>) returns a reference to a range. So, Cells(2,1) is the same as Range("A2").
Sub Macro7()
    Dim aRng As Range
    Set aRng = ActiveWorkbook.Worksheets("Sheet1").Cells(2, 1)
    End Sub
Note that the first argument specifies the row and the second argument specifies the column.
The careful reader will note a difference between the use of Range property in Macro3 and Macro4 and its use in Macro6 and Macro7. In each of Macro6 and Macro7, the cell specification started with the ActiveWorkbook. However, the code in Macro3 (or Macro4) simply refers to 'Range' with no preceding qualifiers. Since a property must apply to an object, when the VBA code contains an unqualified use of the Range property, Excel makes an assumption about the object to which the property applies. It chooses the active sheet. So, the unqualified reference to Range("A2") is equivalent to ActiveSheet.Range("A2"). While this might seem like a good idea and a timesaver while writing macros, the programmer must be very -- very -- careful about unintended side effects of Excel's assumption regarding the programmer's intent. It is extremely good practice to avoid the use of an unqualified Range (or Cells) property.
The process of copying a cell to another location involves use of the Copy and Paste methods (as shown in Macro3). However, if were to check the online help for the Copy method of the Range collection, it becomes clear that it supports an argument called Destination.
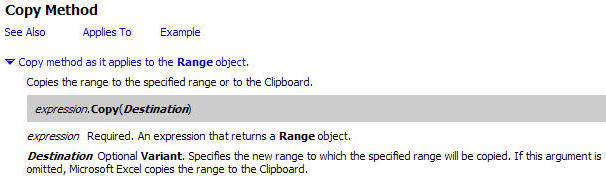
Now, it becomes easy to see how Macro4 came into being. Apply the Copy method to the Range collection specified by Range("A1"). By specifying the Destination argument, one can fold the Paste operation into the Copy operation!
Range("A1").Copy Destination:=Range("AA1")
Example 2: Save the current content of cell A1 in the first empty cell starting with AA1
In this, the second example, the current contents of cell A1 are to be copied to the first available cell in, or to the right of, cell AA1. How do we do this? Clearly, if AA1 is empty, then the code in Macro4 will suffice. However, if AA1 already contains something, the easiest way to find the first empty cell to the right of AA1 is the following: Click in the absolutely last cell in row 1 (IV1). Then use CTRL+<left arrow> to find the last used cell in the row. Finally, use the <right arrow> to find the first empty cell.
First, we will check if cell AA1 is empty. If so, the one-liner in Macro4 will apply. In Excel VBE help, check the If statement and also search for the keyword 'empty' (without the quotes). One of the suggested topics will be the IsEmpty function. Click on the topic to learn more about it. Finally, combine the If and the IsEmpty to get:
    If IsEmpty(Range("aa1")) Then
        Range("a1").Copy Destination:=Range("AA1")
        End If
For the second part of the code, type something (it doesn't matter what) in cell AA1. Then, turn on the macro recorder and carry out the steps yourself. This will both make sure you understand the process and also give you the necessary VBA code:
Sub Macro9()
'
' Macro9 Macro
' Macro recorded 4/13/2003 by Tushar Mehta
'

'
    Application.Goto Reference:="R1C256"
    Selection.End(xlToLeft).Select
    Range("AB1").Select
    End Sub
The first line of the code is redundant. While it is necessary to physically go to the last cell when carrying out the process by hand, it is not necessary to do so programmatically. We just refer to the last cell as Range("IV1").
The next line, Selection.End(xlToLeft).Select takes us to the last cell in row 1 that contains data. However, the next line (Range("AB1").Select) is a hard reference to cell AB1 rather than to the cell just to the right of the one selected with the .End property. For this, we need to check the available properties and methods of the Range collection. Looking through the properties of the Range collection leads us to a plausible property -- the Offset property.
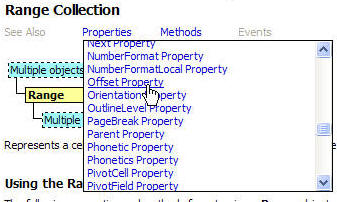
Sure enough, checking the Offset property indicates that it is just what the doctor ordered.

So, we put together the .GoTo method, the .End property, and the .Offset property to get:
Range("A1").Copy Destination:=Range("IV1").End(xlToLeft).Offset(0, 1)
Remember, this code is required only if cell AA1 is already full. So, we add it to the Else part of the If statement in Macro8 to get
Sub Macro8()
    If IsEmpty(Range("aa1")) Then
        Range("a1").Copy Destination:=Range("AA1")
    Else
        Range("A1").Copy Destination:=Range("IV1").End(xlToLeft).Offset(0, 1)
        End If
    End Sub
Here is a question to consider. Why do we need the If statement? Why can't we use the argument Destination:=Range("IV1").End(xlToLeft).Offset(0, 1) irrespective of whether AA1 is empty or not. The easiest way to see is to delete everything in AA1:IV1 and carry out the steps we used to generate Macro9 above. Where do you land up? It sure isn't AA1, is it?
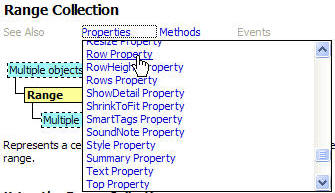
In this, the third example, we will copy the cell given by the intersection of column A and the current row. We will then save the contents in the first empty cell (in or to the right of column AA in the current row). The reader will note that the only difference between this example and the previous one is the requirement that we operate on the current row. The easiest way to find the current row is to check the ActiveCell property. If returns a Range collection consisting of a single cell, the current cell (or the currently active cell). We still need to find the row number of the ActiveCell. Checking the properties of the Range collection yields the Row property.
 |
 |
Basically, we need to replace all references to row 1 in Macro8 with a reference to the current row. There are multiple ways to do this.
- Create references to the current row by using the relative offset from row 1. We would do this with the Offset property (a property already illustrated above). This is left as an exercise for the reader.
- Another alternative is the Cells property (mentioned above but not demonstrated).
- Finally, continue using the Range property but replace the reference to 1 with the current row. With one example, this is also left as an exercise for the reader. The reference to Range("A1") would become Range("A" & ActiveCell.Row)
How do we use the Cells property of the Worksheet object rather than the Range property? The Cells property requires the specification of both the row and the column through numbers. It is easy to figure out that Range("A1") becomes Cell(1,1). However, what is the number corresponding to column AA? Or what is the number corresponding to the last column in a worksheet? Rather than count 1, 2, 3, etc., while checking off columns A, B, C, etc., we can get the column number for AA with the code Columns("AA").Column. Or, for that matter, Range("AA1").Column!
Similarly, we don't have to know how large a spreadsheet can be in various versions of Excel. We just use Columns.Count to get Excel to give us the number of columns supported in a particular version of the program.
Applying the ideas of the above two paragraphs to the various ranges, we get the following changes:
Range("A1") becomes Cells(ActiveCell.Row,1),
Range ("AA1") becomes Cells(ActiveCell.Row, Columns("AA").Column), and
Range("IV1").End(xlToLeft).Offset(0, 1) becomes Cells(ActiveCell.Row,Columns.Count).End(xlToLeft).Offset(0, 1)
Note that we have a lot of references to ActiveCell.Row. We can make the code a little easier to read by using a variable for that information. Similarly, we replace the multiple references to to Range("AA1") with a variable. The final macro becomes:
Sub Macro11()
    Dim CurrRow As Long, ColAACell As Range
    CurrRow = ActiveCell.Row
    Set ColAACell = Cells(CurrRow, Columns("aa").Column)
    If IsEmpty(ColAACell) Then
        Cells(CurrRow, 1).Copy Destination:=ColAACell
    Else
        Cells(CurrRow, 1).Copy _
            Destination:=Cells(CurrRow, Columns.Count).End(xlToLeft).Offset(0, 1)
        End If
    End Sub
Example 4: Add a formula to a range of cells
In this example, some number of cells in column E starting with cell E3 contain numbers. The corresponding cells in column F should have the formula =<column E cell>/60.
We get the basic code from the macro recorder. Turn it on. Click in F3 and enter the formula =E3/60. Click in E3. CTRL+<down arrow> to move to the last cell in E3 that contains information. Use the right arrow to move to the corresponding cell in column F. Use SHIFT+CTRL+<up arrow> to select all the cells up to and including F3. Use CTRL+D to fill down all the cells with the formula in F3. The code from the macro recorder is shown in the macro Test0 below.
Sub Test0()
    '
    ' Test0 Macro
    ' Macro recorded 4/13/2003 by Tushar Mehta
    '

    '
    Range("F3").Select
    ActiveCell.FormulaR1C1 = "=RC[-1]/60"
    Range("E3").Select
    Selection.End(xlDown).Select
    Range("F25").Select
    Range(Selection, Selection.End(xlUp)).Select
    Selection.FillDown
    End Sub
As in example 1 above, we note that the macro recorder faithfully duplicated the user's actions, including the various select statements. In three steps (Test1, Test2, and Test3 below) we will 'compact' the code until we are down to a single executable statement!
The first pass will use the Offset property illustrated in the previous examples to remove the Selects from Test0. The code in Test1 more or less duplicates the code in Test0. It uses the variable 'x' to simplify the multiple references to E3 and F3 as the 'selection.'
Sub Test1()
    Dim x As Range
    Set x = Range("E3")
    x.Offset(0, 1).FormulaR1C1 = "=RC[-1]/60"
    Set x = Range(x, x.End(xlDown))
    Set x = x.Offset(0, 1)
    x.FillDown
    End Sub
The table below compares the two subroutines
Sub Test0()

    Range("F3").Select
    ActiveCell.FormulaR1C1 = "=RC[-1]/60"
|
Sub Test1()
    Dim x As Range
    Set x = Range("E3")
    x.Offset(0, 1).FormulaR1C1 = "=RC[-1]/60"
|
    Range("E3").Select
    Selection.End(xlDown).Select
|
Set x = Range(x, x.End(xlDown)) |
    Range("F25").Select
    Range(Selection, Selection.End(xlUp)).Select
    Selection.FillDown
    End Sub
|
    Set x = x.Offset(0, 1)
    x.FillDown
    End Sub
|
In the next example, we recognize that to fill in column F there is no need to use multiple steps to adjust x. It is quite straightforward to combine them into a single
    Set x = Range(x, x.End(xlDown)).Offset(0, 1)
    x.FillDown
or even better, the single statement
Range(x, x.End(xlDown)).Offset(0, 1).FillDown
This means that we don't really need all the references to variable x. Remember, that it was just a convenient way to refer to cell E3. With the use of a With statement, we get
Sub Test2()
    With Range("E3")
    .Offset(0, 1).FormulaR1C1 = "=RC[-1]/60"
    Range(.Cells(1, 1), .End(xlDown)).Offset(0, 1).FillDown
        End With
    End Sub
Sub Test1()
    Dim x As Range
    Set x = Range("E3")
    x.Offset(0, 1).FormulaR1C1 = "=RC[-1]/60"
|
Sub Test2()

    With Range("E3")
    .Offset(0, 1).FormulaR1C1 = "=RC[-1]/60"
|
    Set x = Range(x, x.End(xlDown))
    Set x = x.Offset(0, 1)
    x.FillDown
    End Sub
|
    Range(.Cells(1, 1), .End(xlDown)).Offset(0, 1).FillDown
        End With
    End Sub
|
In the final step, we recognize that there is really no need to enter the formula in one cell and copy it down to other cells in the same column. We could just as easily enter the formula for all affected cells in column F in a single step.
Sub Test3()
    With Range("E3")
    Range(.Cells(1, 1), .End(xlDown)).Offset(0, 1).FormulaR1C1 = "=RC[-1]/60"
        End With
    End Sub
How does this work? Simple:
Range(.Cells(1, 1), .End(xlDown)) |
identifies the cells in column E that contain data |
Range(.Cells(1, 1), .End(xlDown)).Offset(0, 1) |
identifies the corresponding cells in column F |
Range(.Cells(1, 1), .End(xlDown)).Offset(0, 1).FormulaR1C1 = "=RC[-1]/60" |
enters the same relative formula in all the column F cells already identified |

