|
|
This add-in is available after a chart has been created. The chart can be in a separate sheet (i.e., a chart sheet) or embedded in a worksheet (within a chartobject). Enter the maximum and minimum values for the various axes into worksheet cells. Each of these cells can have a number that has been typed in, or a formula that yields a number.
Click the chart (or the tab of the chart sheet). On the chart menu bar, next to the Help menu, will be a new menu named TM. Select TM | Automate Chart limits...
|
|
This will bring up the dialog box that lets one specify the various limits for the selected chart (see Figure 4).
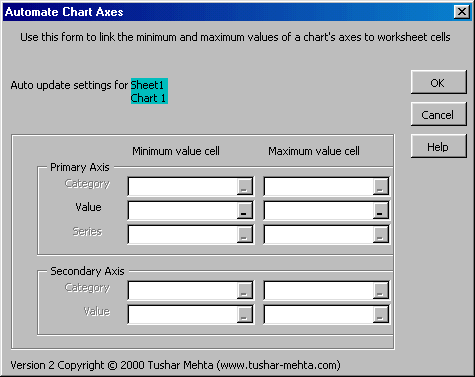 |
Only those fields relevant to the chart will be enabled. Fields corresponding to other axes will be disabled and dimmed. For those axes whose limits are to be dynamically adjusted, specify the cell that contains the limit value. Leave other dialog box entries blank.
The dialog box identifies by name the chart that will be automated.
Identify the cells that contain the minimum and maximum values for each of the three axes, the Category, Value, and Series axes in this area. Each entry should contain a reference to one cell. Those limits (minimum or maximum values) that do not have to be dynamically changed should be left blank.
Remember that a Series axis applies only to a 3-D chart.
For a 2-D chart, it is possible to have a secondary category axis as well as a secondary value axis. For each of these, the cells that contain the corresponding minimum and maximum values are specified in this section of the dialog box.
OK, OK, I know you know, but for the sake of completeness...
The OK button lets the add-in start its work, the CANCEL button stops the add-in from going any further, and the HELP button brings up this help information.
|
